You click Show users on a shop’s website, and a customer’s name appears. Where did the website get that name?
The answer involves two messages: one asking for the information and another carrying the reply. These are an API request and response. Following them helps you check the source of the name, which the visible page alone cannot tell you.
Our example uses a fictional shop. After following its messages, you will read an exchange from the course’s practice service. The lesson needs only a browser.
Understand how an API request and response work
What is an API?
An API, short for Application Programming Interface, gives one program a supported way to ask another program for information or to do something.
Your browser is one such program. The shop runs its own software on a server, a computer that receives requests and sends replies. That software has access to the customer information. Through the shop’s API, the browser can ask for it.
The API sets out how to ask for the customer list and what kind of reply to expect. It might also offer other actions, such as placing an order. Here, the browser only wants to read the list. The shop’s address and customer name are invented for this example.
The browser asks, and the server replies
After you click Show users, the browser sends a message asking for the customer list. That message is the request.
The shop’s server receives the request and sends a message back with the customer information. That reply is the response.
There are two useful names for the roles in this exchange:
- The client sends the request. Here, the browser is the client.
- The server receives the request and sends the response. Here, it is the shop’s server.
You start the action by clicking, but the browser sends the message. That makes the browser the client in this exchange. Its request travels to the server, and the response travels back.
What goes into an API request?
The browser needs to say where it is asking, what it wants done, and whether it is sending any information. The web API in our example uses HTTP, the rules that describe how web requests and responses are exchanged. HTTP stands for Hypertext Transfer Protocol. You will see this name in tools that show these messages.
Four parts help you read the request: its URL, method, headers, and body. Each contributes something the server may need to handle it.
URL: the address for the request
A URL is a web address. You have used one when opening a website. An API request also needs an address, so the client can ask the right service for the right information.
Suppose the shop’s customer list is available at https://shop.example.test/api/users. The shop.example.test part identifies the server’s website address, and /api/users identifies the part of that service we want. A different address could point to orders. This fictional address illustrates where the request goes; it is not a working practice link.
Request method: the action we want
The address alone does not say whether we want to read information or send new information. The request method supplies the action. It is a short word included in the request.
To read the customer list, the browser uses GET. This method asks the server to return information from the chosen address. Adding or editing a customer would need a different action. GET and the URL work together: one asks for a read, and the other identifies what to read.
Request headers: extra details about the message
A header is a named piece of information about a message. A request can have several headers. Each is written as a name followed by a colon and a value. The value supplies the detail for that name.
The browser might include a header asking for a particular reply format. A format is a way of arranging information so the receiving program can read it. One common choice is JSON, short for JavaScript Object Notation. JSON carries data as text, using labels and their values. Despite its full name, reading a little JSON does not require JavaScript knowledge.
The request header Accept: application/json says that the client is asking for a JSON response. Accept is the header name, and application/json is the value that names the format. This header describes the client’s preference; it does not tell us what the server actually returned. We check that in the response.
The header accompanies the request; it does not replace its address or action.
Request body: data sent to the server
The request body can carry data from the client to the server. If the shop offered a way to add a customer, the body might contain the new customer’s name and email address. The server would then have the details needed for that action.
Our GET request sends no body because it is asking for the existing list. The customer data comes back in the response body instead. So a request without a body can still receive a reply containing data.
When a client sends a JSON body, a request header such as Content-Type: application/json describes the format of that outgoing body. It has a different job from Accept: request Content-Type describes the data we are sending; Accept asks for a preferred format for the reply. Our body-free shop request does not need a Content-Type header to describe an outgoing JSON body.
Put the request parts together
Here is the shop’s request with those parts labeled. It is a simplified display of the message:
Method: GET
URL: https://shop.example.test/api/users
Headers:
  Accept: application/json
Body: None
Read it as one message: “Please return the information at this address. I would like the reply in JSON format. I am not sending any data in a request body.”
Body: None is a label in this display. It means the request has no body; the browser is not sending the word “None” as customer data.
You may see the method and URL written together in a short transcript:
GET https://shop.example.test/api/usersThat shorter line shows the action and address. It does not show the whole request, and it does not prove that no headers were sent. Tools and transcripts sometimes show only the parts relevant to the example.
Nothing in this request tells us the customer’s name. For that, we need the server’s reply.
What comes back in an API response?
The reply has a status code, headers, and a body. These tell the client how the request was handled and what came back. Headers and bodies can appear in both messages; in the response, they travel from the server to the client.
The status code reports the outcome of the request.
A status code is a three-digit number reporting the request’s outcome. For our GET, 200 means the request succeeded. Other codes can report problems, such as information that was not found.
The status does not contain a customer’s name. A successful status also does not prove that every returned value is correct. We still need to inspect the data.
Response headers give details about the reply.
The server can send Content-Type: application/json as a response header. Here, it tells the client that the response body is in JSON format. The same header name can appear in either direction: request Content-Type describes the request body, while response Content-Type describes the response body.
Compare that with our request’s Accept header. The client asked for JSON through Accept. The server’s response Content-Type tells us the format it actually sent. Requesting a format and receiving that format are two separate things to check.
The response body carries the returned content, when there is any.
For the shop’s customer-list request, the response body contains customer data. Other responses may have an empty body or contain information about an error. A body is therefore not automatically proof of success; read it alongside the status and headers.
Read the shop’s reply one part at a time
The shop’s JSON body arranges the customer details as labels paired with values. A label names a piece of information; its value supplies that information. Our customer’s name value is Amina Cole. The id value is 1, a number used to identify this customer.
JSON places quotation marks around labels and text values. A colon separates each label from its value. With those rules, the customer’s name is written as "name":"Amina Cole". The identifying number is written as "id":1; the number has no quotation marks because it is a number, rather than text.
Braces { } group the label/value pairs belonging to one customer, and a comma separates those pairs. Square brackets [ ] surround a list of customers. Our list has one customer, so its braces sit inside the list’s square brackets.
A successful reply containing that customer would look like this, with the response parts labeled:
Status code: 200
Headers:
  Content-Type: application/json
Body:
  [{"id":1,"name":"Amina Cole"}]
Start with the status: 200 reports success for this GET. Then read the header: Content-Type: application/json describes the body as JSON. The final line is the body itself. The square brackets hold the list, the braces group our customer’s information, and the name appears as the text value beside its label.
Some transcripts shorten the status to HTTP 200. The HTTP label refers to the web-message rules we introduced earlier; 200 is the status code. The meaning of the reply has not changed just because the display is shorter.
The customer’s name is in the body. Neither the success code nor the format header contains it.
The response and the page are different things
The browser can take Amina Cole from the response body and show it on the page. That is how the click in our opening example leads to a displayed name.
But receiving a name and displaying it correctly are separate steps. If the page shows the wrong name, comparing it with the response helps you decide what to check next.
For example, suppose the body still contains Amina Cole, but the page shows Guest. The name returned by the server and the name displayed by the browser differ. Your next step would be to check how the client uses that response. The difference alone does not tell you the exact cause.
The assignment describes another request and reply, using a different service and different data. It gives you a short written example to read, called a transcript. You will use that example to answer three questions.
Use these ideas in the assignment
Continue practicing: Understand an API before sending a request
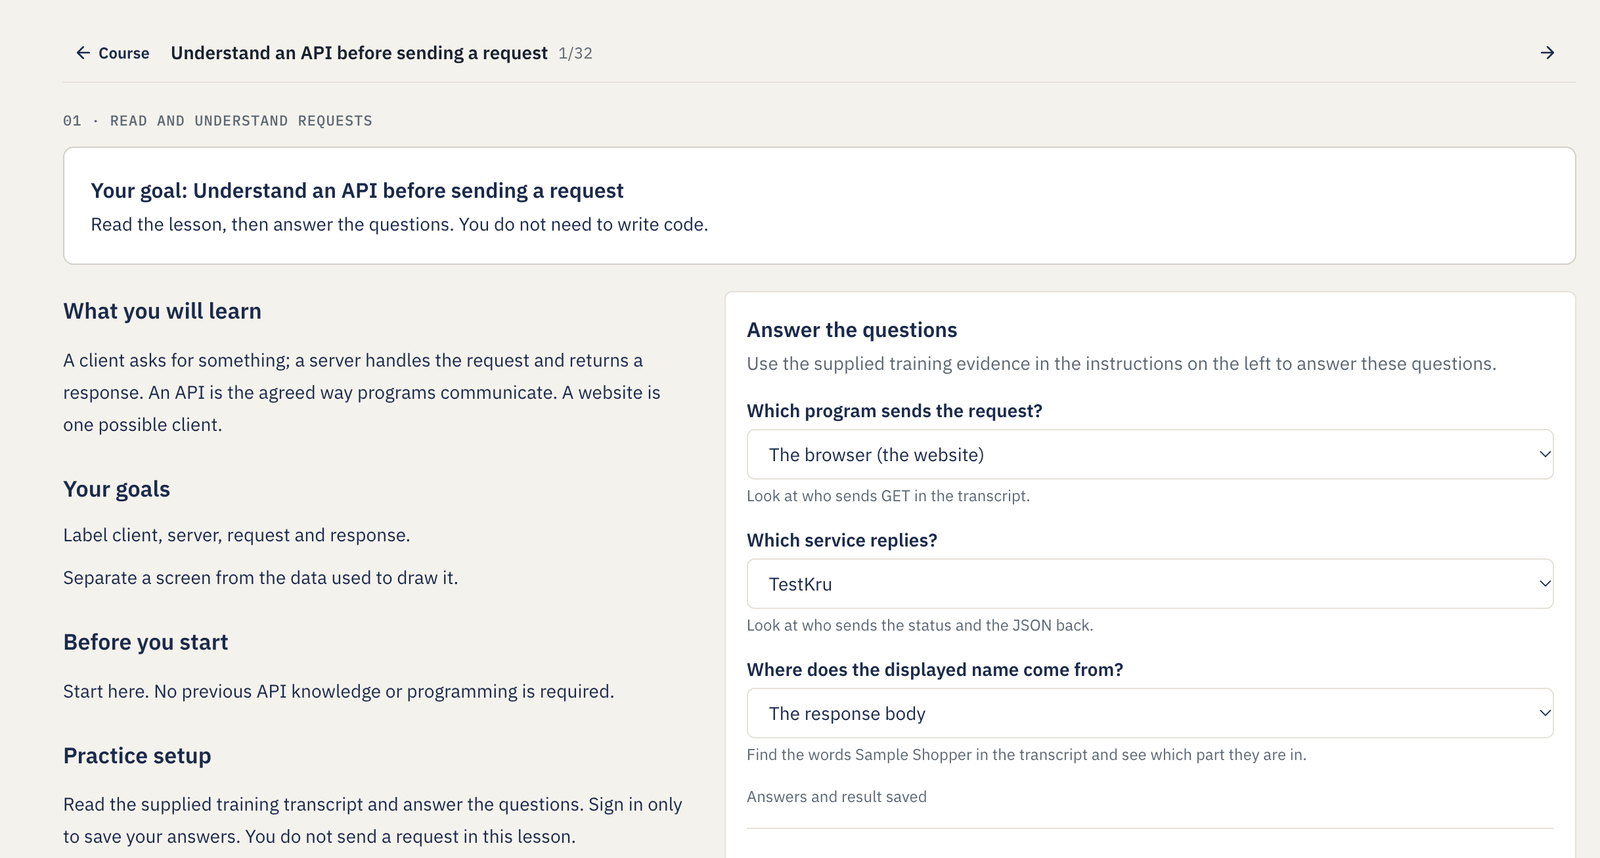
Your task is to read the short example on the assignment page and answer three questions: who sends the request, who sends the reply, and where the name shown on the page comes from. This checks whether you can follow a request and response without sending one yourself.
The example uses TestKru, the practice API service for this course. The shopper and Show users click are part of the written story. You are not being asked to find a shop website or click that button.
In the screenshot above, the instructions are on the left and Answer the questions is on the right. Each question has a dropdown, a box you click to open a list of possible answers. Use the written example to choose an answer in each box; the screenshot’s selections are not instructions to copy.
Read the example and choose your answers
- Open the assignment using the link above. If it asks you to sign in to save your answers, sign in on the CodeKru page. This assignment needs no installation or API request.
- Find the written example. In the instructions, scroll to Supplied training evidence / contract. Despite that heading’s formal wording, this section is simply the short example you need to read. It starts with a shopper clicking Show users, then describes a GET request, a reply, and a name appearing on the page. Read the whole paragraph before choosing answers. Use this paragraph, rather than opening its API URL, because a new reply might contain different data.
- Answer “Which program sends the request?” Find the sentence containing GET in the example. Ask yourself: which program is doing the sending? The person who clicks starts the action, but the question asks for the program sending the message. Click the dropdown under this question and choose the option that matches the sentence. That program has the client role.
- Answer “Which service replies?” Find the sentence describing who sends the reply back. Look for the service doing the replying, rather than a piece of the reply such as its status or data. Choose the matching option in the second dropdown. This service has the server role.
- Answer “Where does the displayed name come from?” Find the words that the example says appear on the page. Then look for those same words earlier in the request or reply. Check the URL, the status, and the returned data, and choose the part that actually contains those words. The question asks where the name is written, not whether the request succeeded.
- Check all three boxes, then click Submit Answers. Before submitting, make sure you can point to the sentence or words that support each choice. Choosing an option fills the box; Submit Answers sends your choices for checking and saves your result.
What to do after submitting
Read the result shown below the questions. If a check says Needs attention, read the note beside it and go back to the relevant sentence in the example. For the first two questions, look for who sends each message. For the third, find the actual name and the part containing it. Change the choice in that question’s dropdown, then click Submit Answers again.
A saved score of 100/100 means all checks passed. Continue opens the next lesson, where you will send a request yourself and read the response.