
The Duration Assertion or we can say response time assertion in Jmeter, is used to verify the response time of HTTP requests, JDBC requests, and other transactions. It allows us to set the maximum time limit for response times. If the response time exceeds the defined threshold, the assertion will fail, indicating performance issues that need to be addressed.
Let’s first make a simple test plan which we can use to demonstrate the functioning of Duration Assertion.
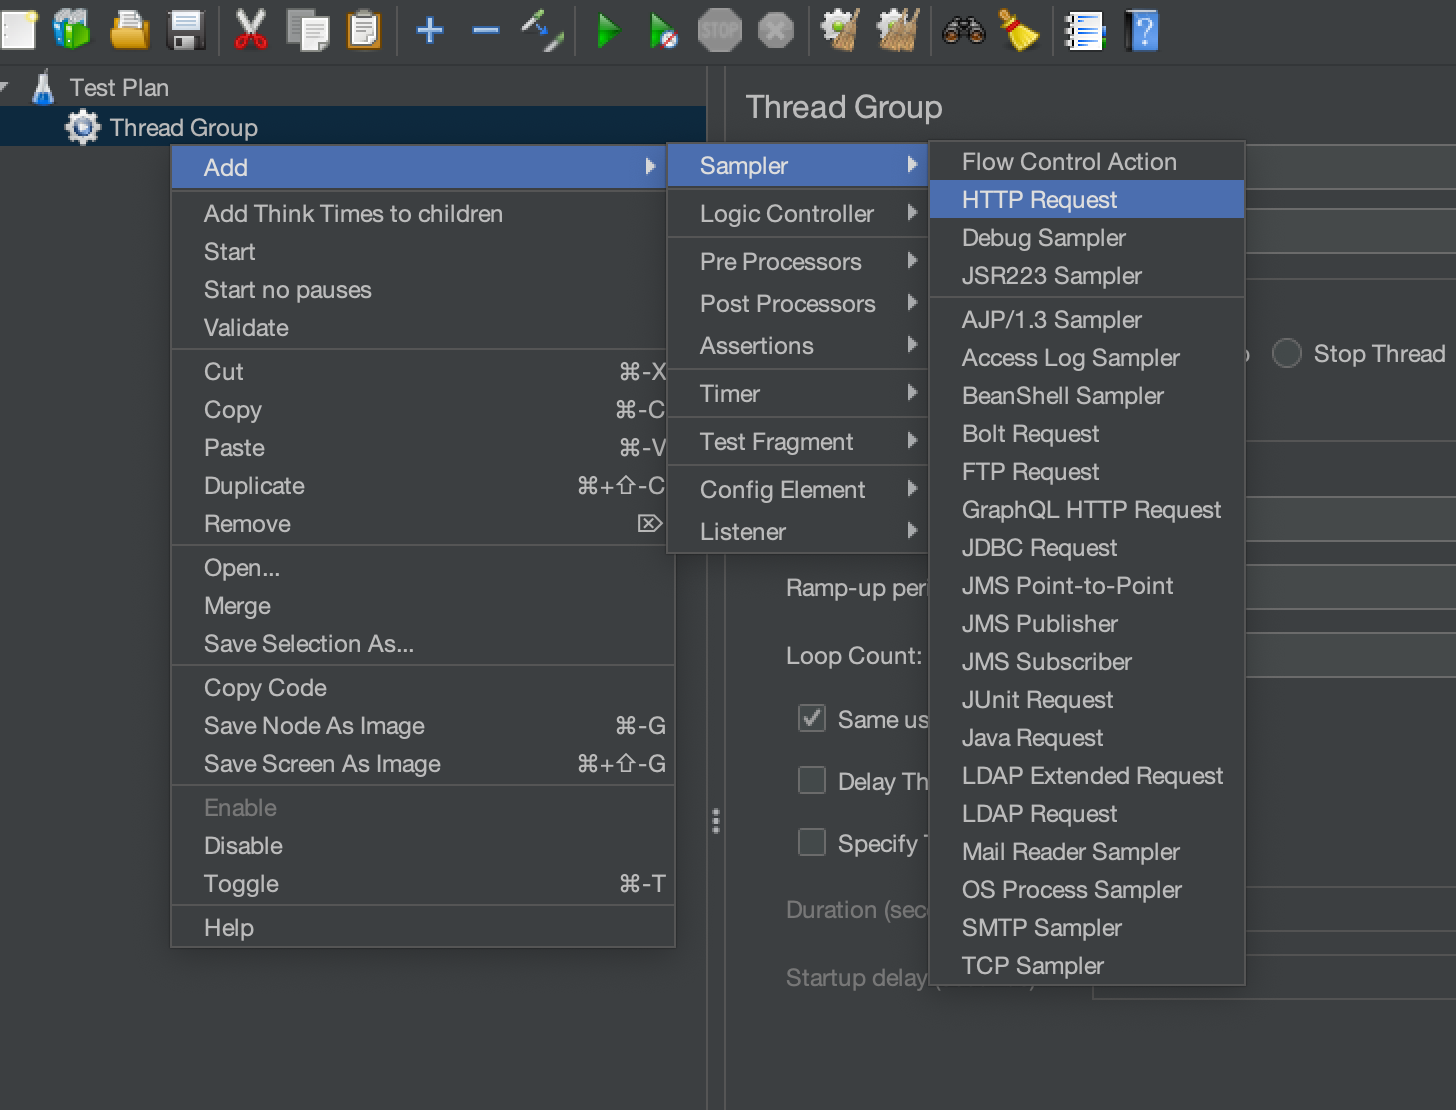
Add an HTTP request
We will hit an HTTP request to “jmeter.apache.org” and then will measure its performance using the Duration Assertion.
Create an HTTP sampler by right-clicking on the Thread Group and selecting “Add” > “Sampler” > “HTTP Request”.
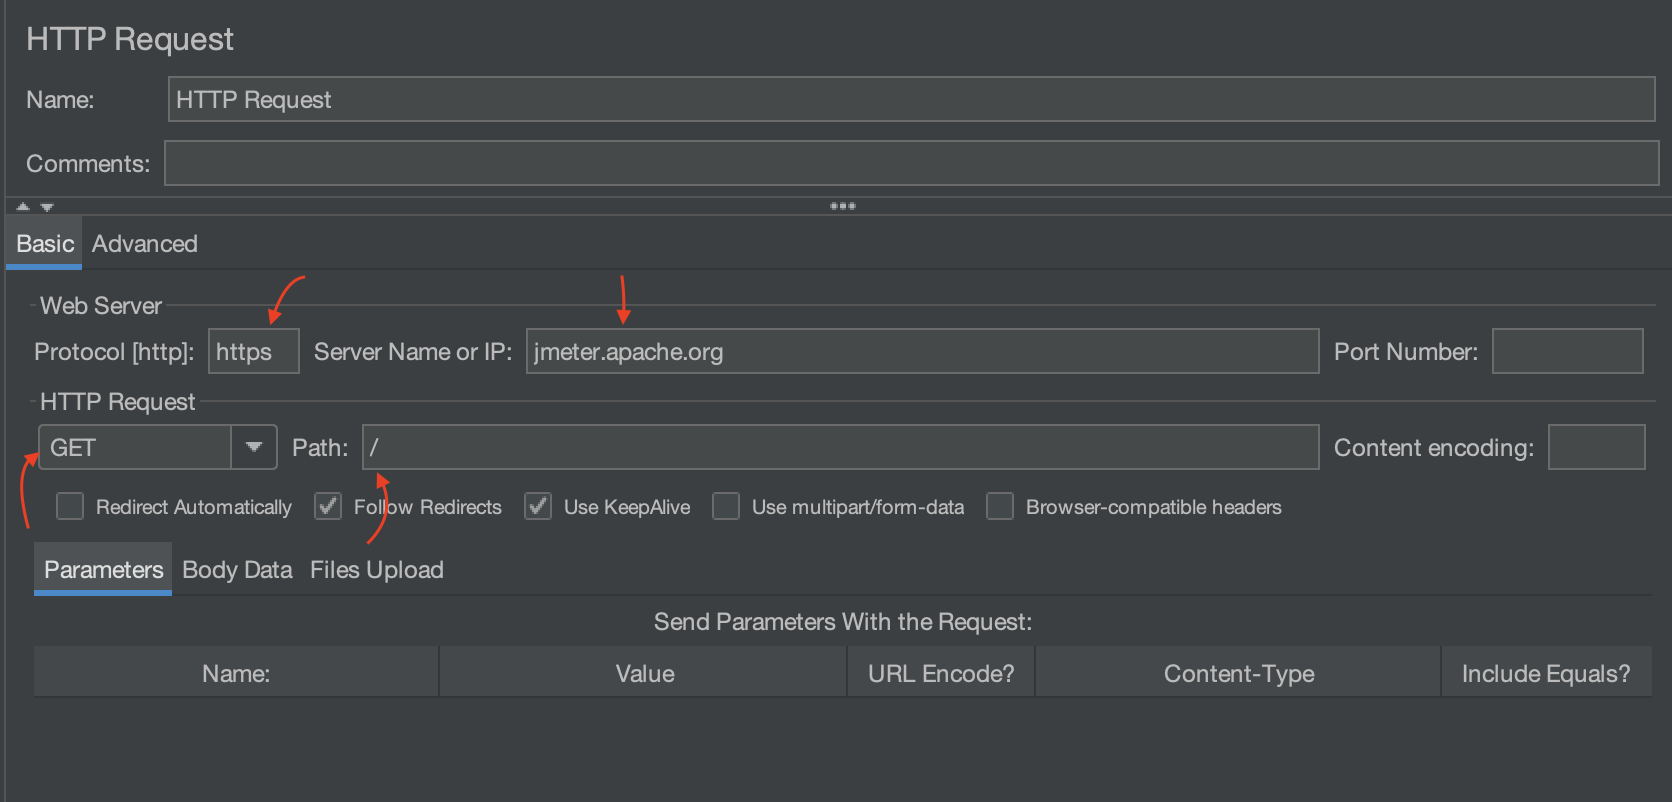
We will hit the get request on the “jmeter.apache.org” URL.
- Put “https” in the input box labeled “Protocol[https]:”.
- Enter “jmeter.apache.org” in the input box labeled “Server Name or IP”.
- By default, the HTTP request value is set to GET. Since we are only executing a GET request, we won’t be changing it.
- Set the Path to “/“.
Let’s add a listener to see information about the requests sent and responses received before hitting the requests.
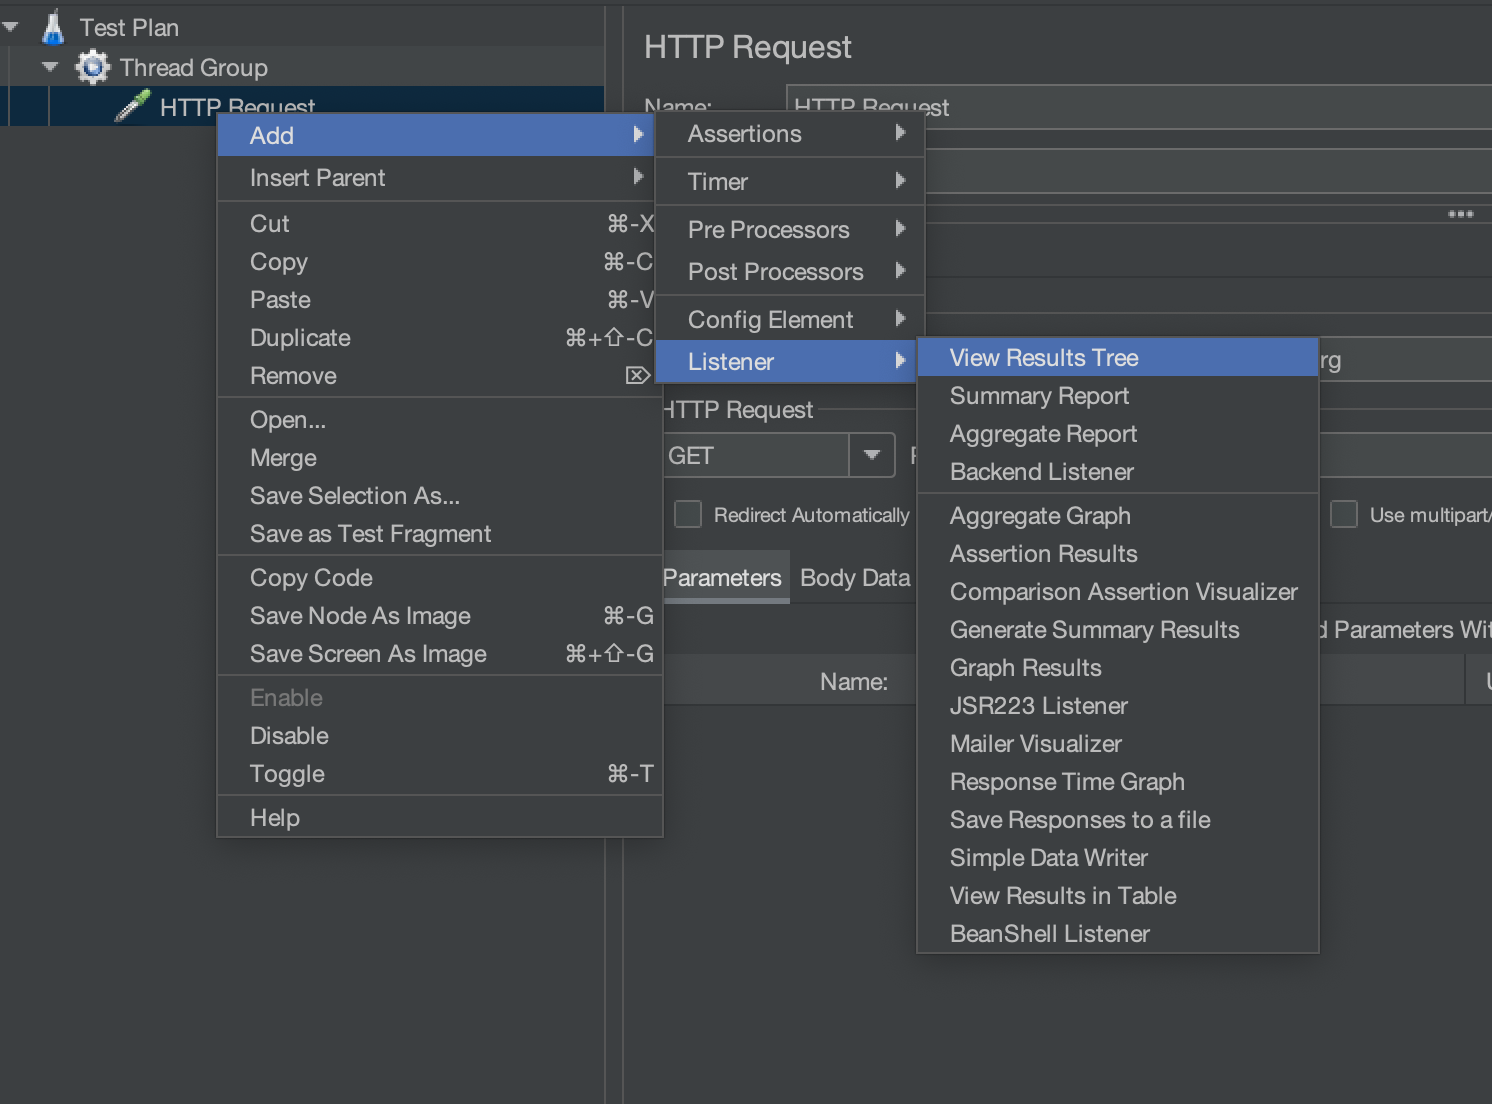
Add “View Results Tree” listener
View Results Tree listener is one of the most used listeners in Jmeter. It provides detailed information about server responses to requests sent during performance testing.
Add the “View Results Tree” listener by right-clicking on the HTTP request and selecting “Add” > “Listener” > “View Result Tree”.
After adding the listener, execute the test by clicking on the green start button.

Now, let’s add the Duration Assertion to assert whether the response of API came within the specified time
Add Duration Assertion
Right-click on the HTTP request and select “Add” > “Assertions” > “Duration Assertion”.


Here you might already be noticing a few things –
- One is the “Apply to” section
- and the second is the “Duration to Assert” section.
Apply to Section
Let’s discuss each of them one by one
Main sample only
- If you choose “Main sample only,” the assertion will only affect the primary sampler, which is the main request being made. It won’t take into account any embedded resources, such as images, stylesheets, or scripts, that may be fetched as part of the main request.
- Suppose you are conducting a web page load test. In that case, the “Main sample only” option will measure the response time of the HTML page itself without taking into account the response times of the embedded resources like images, CSS files, and JavaScript files.
Sub-samples only
- When selecting “Sub-samples only,” the assertion applies only to embedded or sub-samples within the primary sampler. This feature is helpful when analyzing individual response times of embedded resources.
- If you are conducting a web page load test and want to ensure that all the images on the page load within a specific time limit, you can use the “Sub-samples only” option.
Main sample and sub-samples
- Selecting “Main sample and sub-samples” means that the assertion will be applied to both the primary sampler and any embedded or sub-samples associated with it.
- In the example of a web page load test, this option evaluates the response time of the main HTML page as well as all embedded resources (images, CSS, JavaScript, etc.) together.
Duration to Assert
Here we specify the maximum time in milliseconds for the expected response. If the response takes longer, the request will fail.
Examples
Now, let’s see it with examples
Example 1
Let’s select the Main sample and sub-samples option and set the time as 40 milliseconds.

Execute the test and check the “View result tree”. The request fails due to exceeding the timeout limit of 40 milliseconds. You can also see the message printed as “The operation lasted too long: It took 505 milliseconds, but should not have lasted longer than 40 milliseconds.”
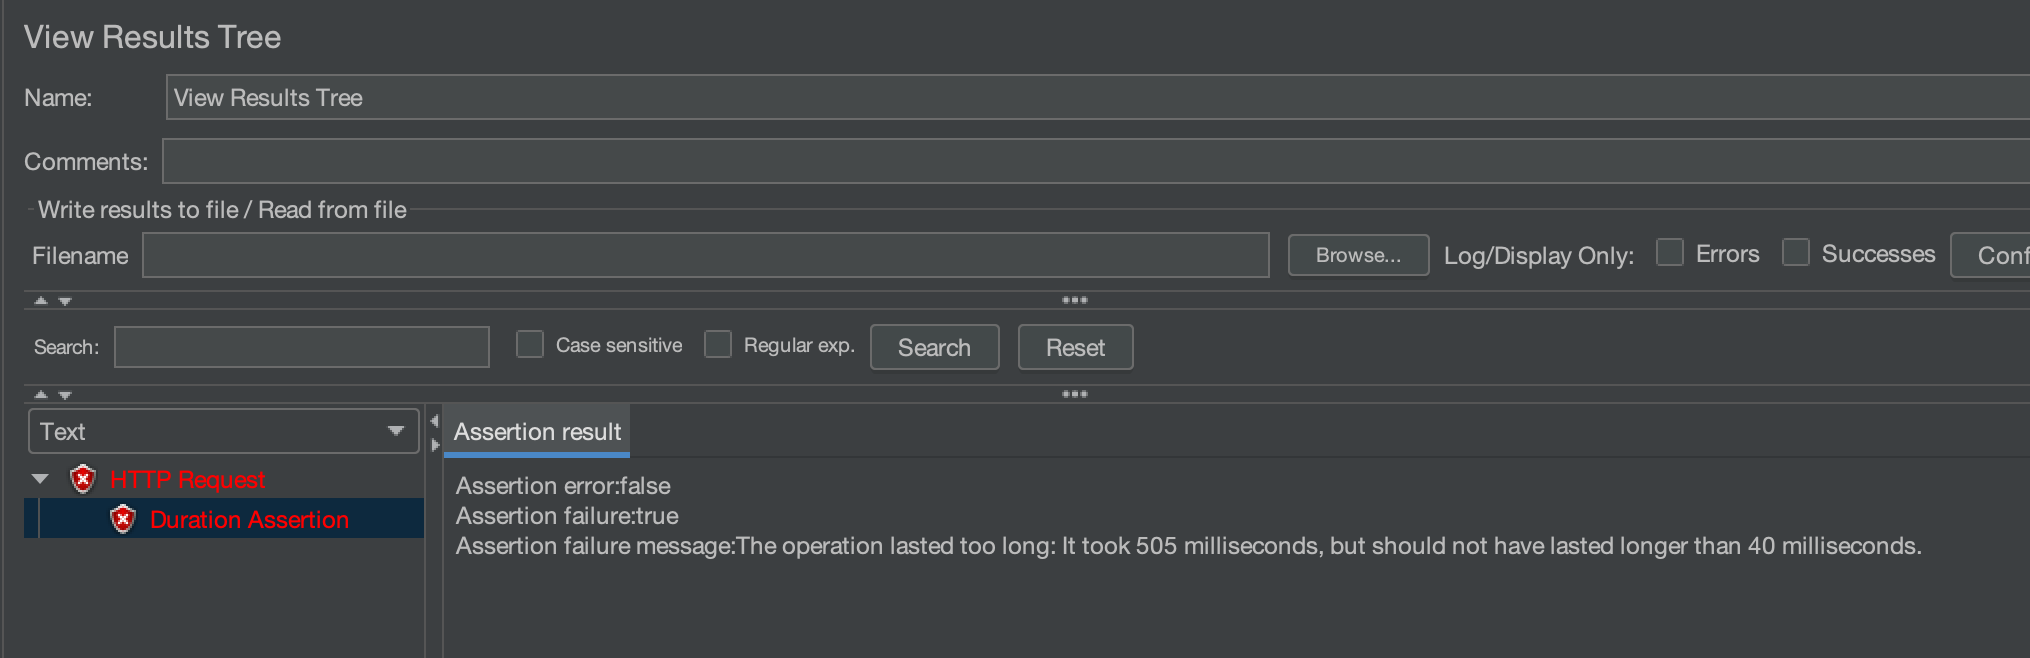
This is how Duration Assertion works in Jmeter and the test case would have passed if the response time was lower than 40 milliseconds.
Example 2
Let’s now choose the option “Sub-samples only” and keep the time at 40 milliseconds.
This time, our test case passed because the sub-samples were processed in less than 40 milliseconds.

This is how we can use the Duration Assertion to assert whether responses are coming within a specified time or not.
We hope that you have liked the article. If you have any doubts or concerns, please write to us in the comments or mail us at admin@codekru.com.