This post will discuss TestNG and how we can run our first test case in TestNG by executing the testng.xml file.
What is TestNG?
TestNG is a testing framework inspired by JUnit and NUnit but introduces some new functionalities that make it more powerful and easier to use, such as:
- It provides support for annotations, which makes writing tests very easy.
- Test whether our code is multithread safe or not.
- Flexible test configuration.
- Supports parallel testing.
- Support for data-driven testing (with @DataProvider).
- Support for parameters.
- It is supported by various tools and plugins (Eclipse, IDEA, Maven, etc.). If you want to configure the TestNG plugin in eclipse, you can read this article; it will surely help you install TestNG in Eclipse.
TestNG is an open-source testing framework where NG stands for Next generation, designed to simplify a broad range of testing needs, from unit testing to integration testing.
How to create a testng.xml file
testng.xml is an XML file that contains the information and the configuration of the test cases. TestNG uses the testng.xml file to run the cases, and we will see how we can create testng.xml to execute our test cases.
Before moving, let’s make a project to run a test case via the testng.xml file.
- Create a maven project ( read this article to create a maven project )
- Install TestNG in eclipse ( read this article to install TestNG in eclipse )
After installing the TestNG, please make sure to add the below TestNG dependency in the pom.xml file
<!-- https://mvnrepository.com/artifact/org.testng/testng -->
<dependency>
    <groupId>org.testng</groupId>
    <artifactId>testng</artifactId>
    <version>7.6.1</version>
    <scope>test</scope>
</dependency>
Now your project structure will look like this –

Note: App.java and AppTest.java are the default java files created by maven. You can choose to keep or delete them according to your requirement. We will delete them for our post.
Below is our pom.xml file after adding the TestNG maven dependency. JUnit dependency was automatically added by the maven when we created the project using the maven command.
<project xmlns="http://maven.apache.org/POM/4.0.0" xmlns:xsi="http://www.w3.org/2001/XMLSchema-instance" xsi:schemaLocation="http://maven.apache.org/POM/4.0.0 http://maven.apache.org/maven-v4_0_0.xsd">
	<modelVersion>4.0.0</modelVersion>
	<groupId>org.website.codekru</groupId>
	<artifactId>DemoProject</artifactId>
	<packaging>jar</packaging>
	<version>1.0-SNAPSHOT</version>
	<name>DemoProject</name>
	<url>http://maven.apache.org</url>

	<dependencies>
		<dependency>
			<groupId>junit</groupId>
			<artifactId>junit</artifactId>
			<version>3.8.1</version>
			<scope>test</scope>
		</dependency>
		<!-- https://mvnrepository.com/artifact/org.testng/testng -->
		<dependency>
			<groupId>org.testng</groupId>
			<artifactId>testng</artifactId>
			<version>7.6.1</version>
		</dependency>

	</dependencies>
</project>
The last thing to do is to make a test case which we can run via the testng.xml file.
We will create a CodekruTest class in the “org.website.codekru” package. CodekruTest class will contain one test case.
CodekruTest.java
package org.website.codekru;

import org.testng.annotations.Test;

public class CodekruTest {

	@Test
	public void test() {
		System.out.println("Executing first test case");
	}

}
The @Test annotation marks a test case, and TestNG will execute only methods marked with the @Test annotation.
Below is the updated project structure.

Now, we will make a testng.xml file to run the test case.
We can create a testng.xml file manually or by using an IDE. We will cover both ways –
Let’s look at both one by one.
Create testng.xml manually
There are five terms we will be using here
- suite
- tests
- packages
- classes
- and methods
There are other terms as well, but we will talk only about the above in this post.
The Below image shows the hierarchy with suite at the top and methods at the bottom. They will also be written in the same order in the testng.xml file.

- A suite in TestNG is represented by the <suite> tag.
- Test in TestNG is represented by the <test> tag.
- A package is represented by the <package> tag
- A single class is represented by the <class> tag.
- And methods in TestNG are represented by the <method> tag.
The tags would also follow the same hierarchy.
We can omit a few of the tags, like it is not mandatory to mention the <package> tag, as each tag serves a purpose, and sometimes we don’t need a tag. But there are also mandatory tags like <suite> and <test>.
Now, let’s run our test case. We can run test cases in multiple ways –
- We can run the package which contains the test cases. It will execute all test cases inside the package.
- Or, we can run the class which contains the test cases. This will execute all test cases inside the class.
- Or, we can run a specific test case or test method.
Run the whole package via testng.xml
Make a new file with the name “testng.xml” at the root of the project ( You can name the file anything, it is not necessary to keep the name a testng.xml )
We can run the whole package by using these tags – <suite>, <test>, <packages>, and <package>
If we remember the hierarchy, the <suite> tag will come first, followed by the <test> and the <package> tags.
<!DOCTYPE suite SYSTEM "https://testng.org/testng-1.0.dtd" >

<suite name="codekru">
	<test name="codekruTest">
		<packages>
			<package name="org.website.codekru" />
		</packages>
	</test>
</suite>
- All tags have a name attribute that defines the name corresponding to a particular tag. We can keep the suite and test name anything but the package name should be a real package name or path we want to execute.
- <packages> tag will contain a list of packages we want to execute. Each package will be mentioned using the <package> tag with the name attribute.
- Here we only had one package, “org.test.codekru“. So, we put the package name as such.
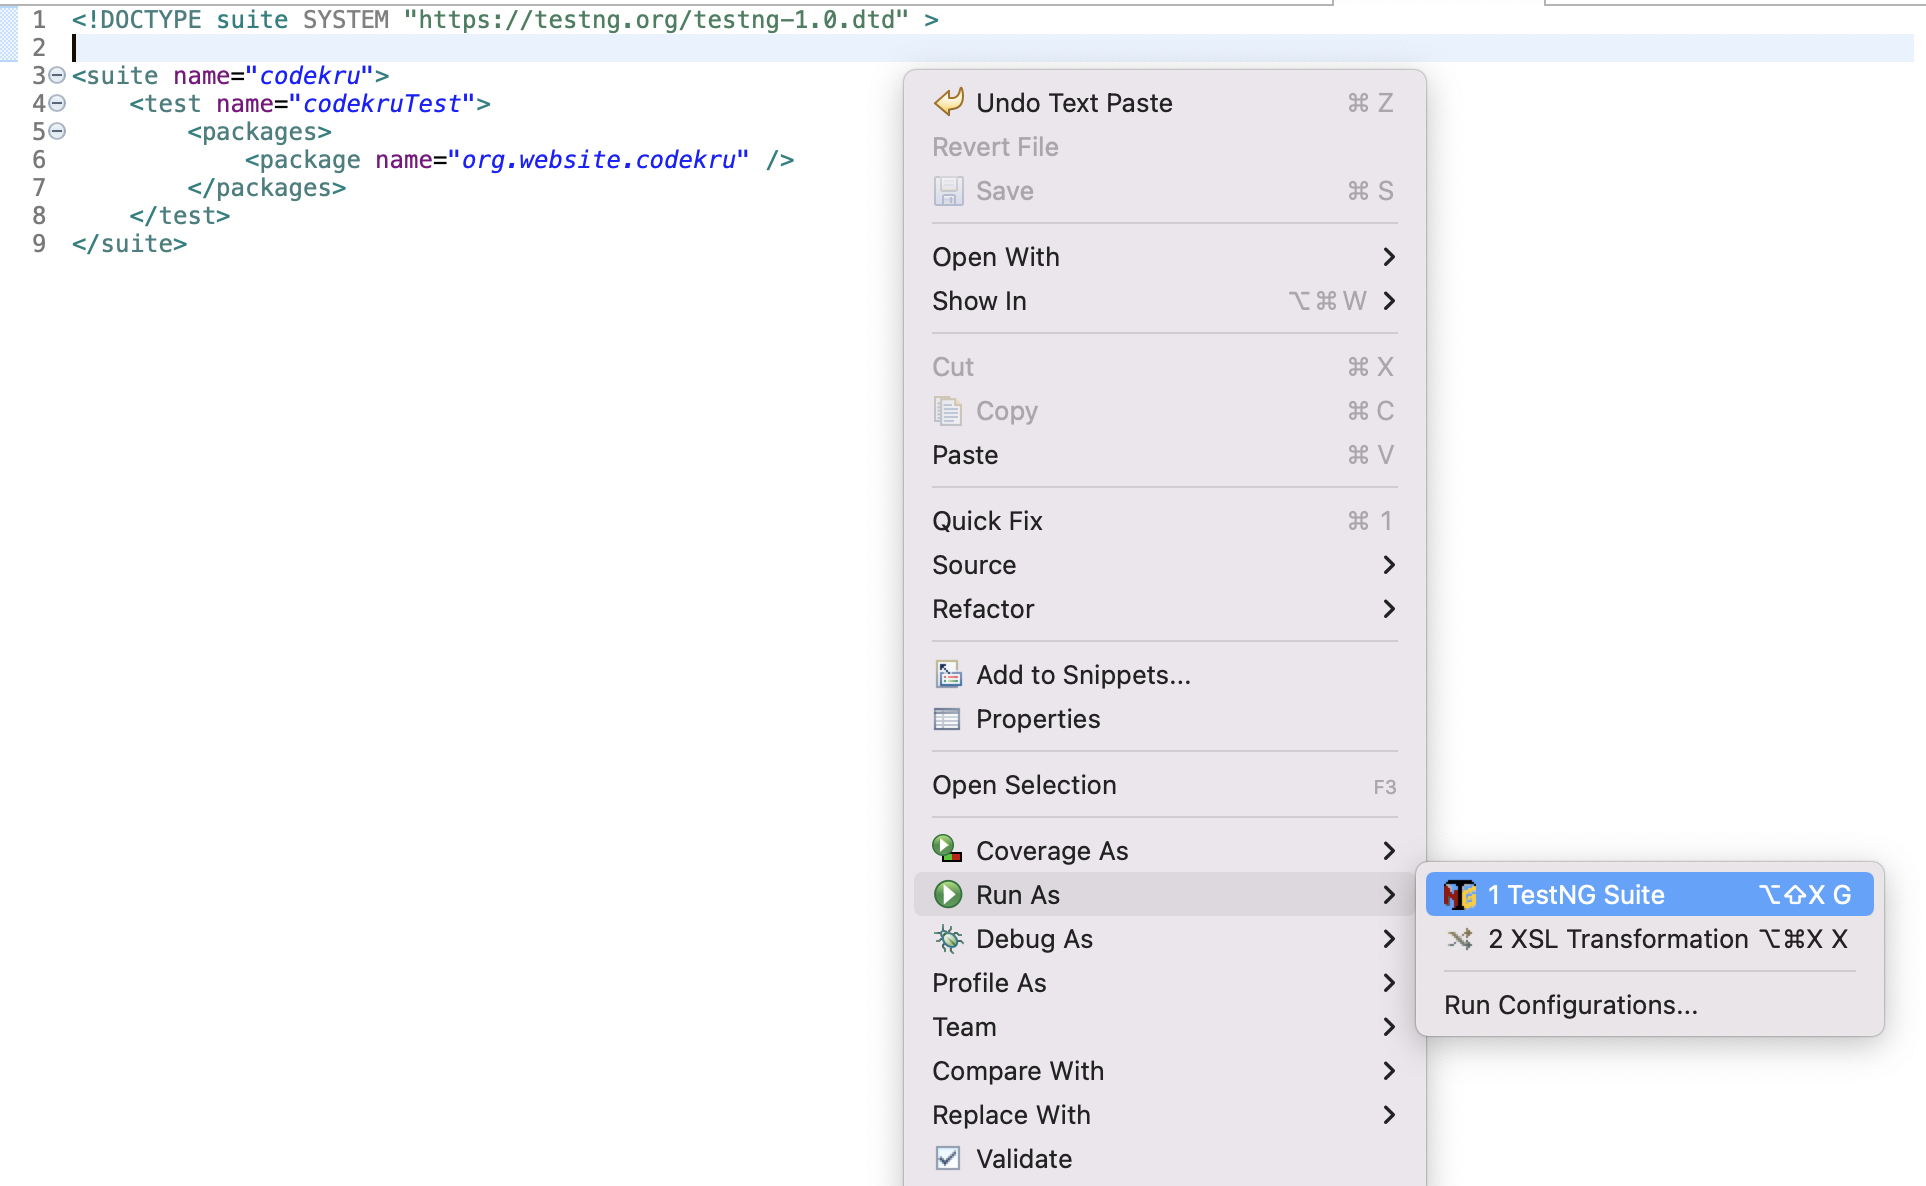
Now, run this XML file. We can run the XML file by right-clicking on the XML file and then choosing Run As > TestNG Suite.

This will run the testng.xml and execute all the cases inside the package. As we only had one test case, so it would that case and we will see the below output on the console.
Executing first test case

===============================================
codekru
Total tests run: 1, Passes: 1, Failures: 0, Skips: 0
===============================================
Run a class via testng.xml
Similarly, we can also run a class that contains the test case. This would require the use of <suite>, <test>, <classes> and the <class> tags in the same order.
<!DOCTYPE suite SYSTEM "https://testng.org/testng-1.0.dtd" >

<suite name="codekru">
	<test name="codekruTest">
		<classes>
			<class name="org.website.codekru.CodekruTest" />
		</classes>
	</test>
</suite>
This is mostly similar to what we have done with the packages.
Here class name is supposed to be written in the format of packageName.className. Our package name is “org.website.codekru” and the class name is “CodekruTest”, so we have written “org.website.codekru.CodekruTest” as the name with the <class> tag.
Now, let’s again execute the XML file, and we will get the below output printed on the console.
Executing first test case

===============================================
codekru
Total tests run: 1, Passes: 1, Failures: 0, Skips: 0
===============================================
We can also run a specific test case via the testng.xml file, and we covered this topic in a different post. Please read that article to get more insight into the topic.
Create testng.xml using eclipse
We can also create the XML file using eclipse, so we don’t have to create it manually.
- Right-click on the class or package whose test cases we want to execute. We will click on the class to execute its cases.
- Then choose TestNG > Convert to TestNG.

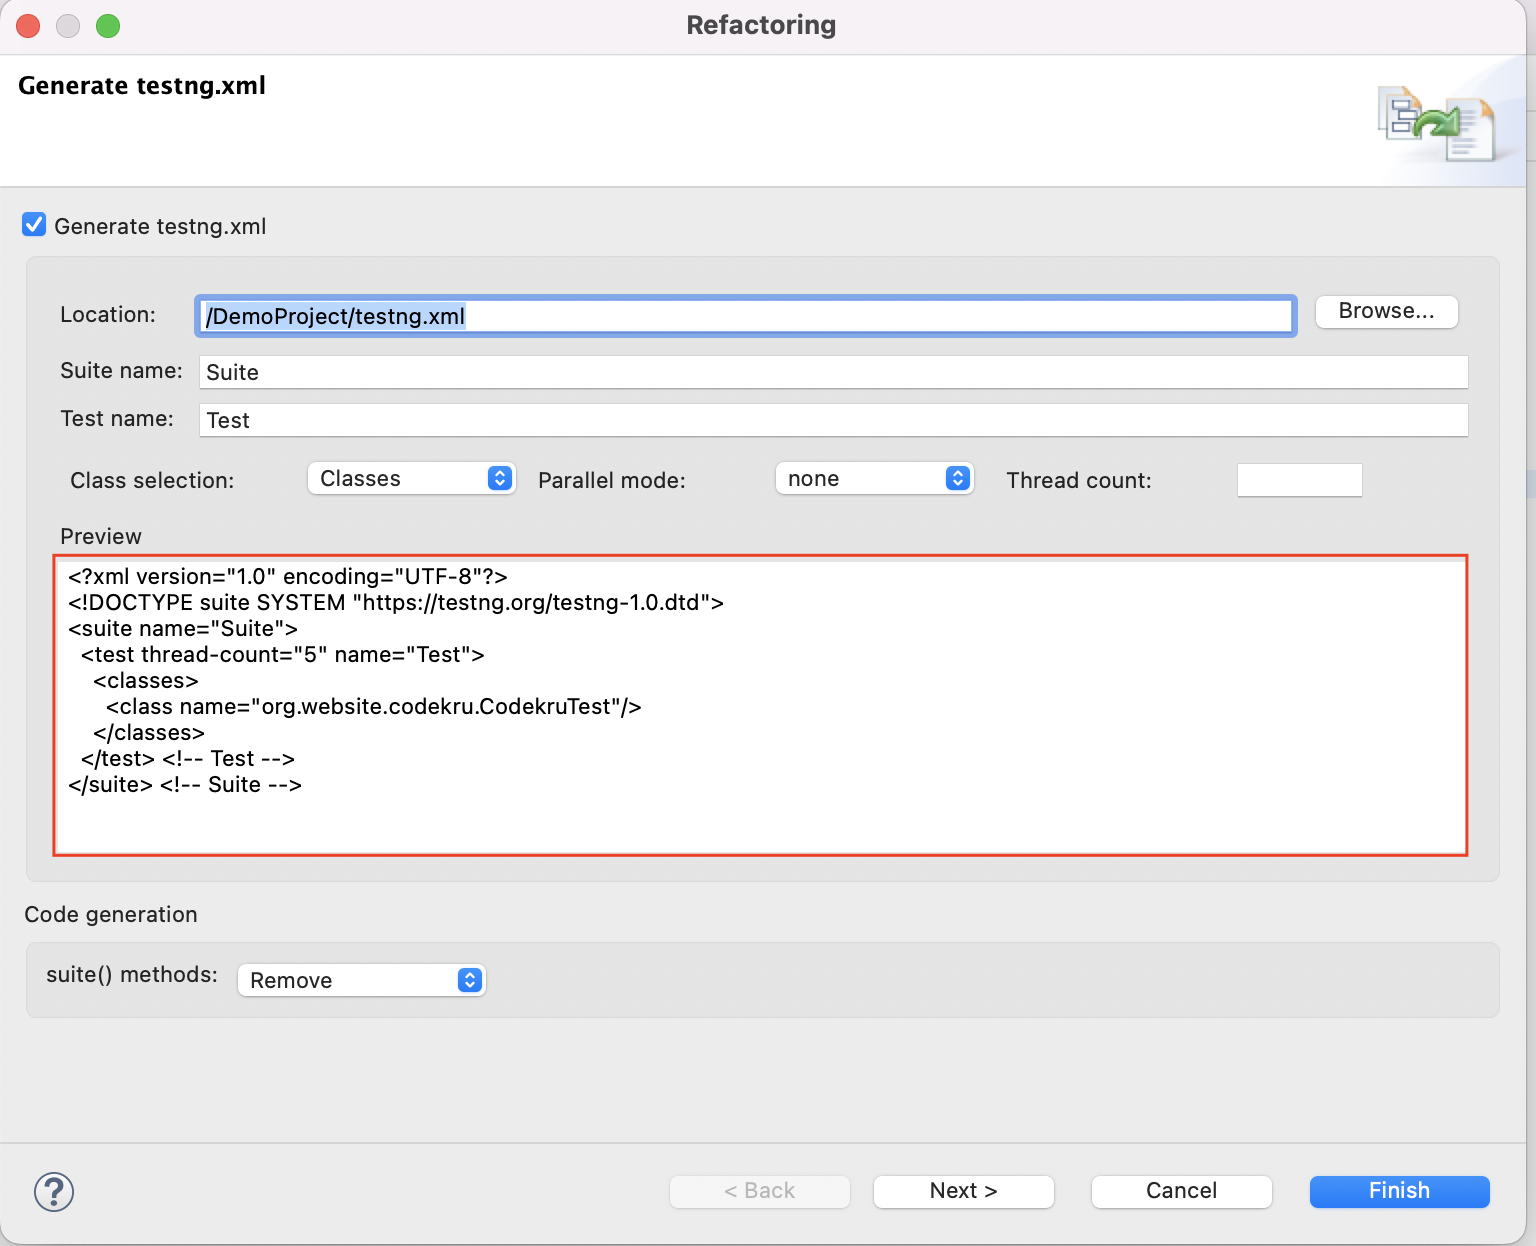
- After clicking on “Convert to TestNG” will open a pop-up.

- We can copy the content inside the preview text box and copy it in our testng.xml file.
<?xml version="1.0" encoding="UTF-8"?>
<!DOCTYPE suite SYSTEM "https://testng.org/testng-1.0.dtd">
<suite name="Suite">
  <test thread-count="5" name="Test">
    <classes>
      <class name="org.website.codekru.CodekruTest"/>
    </classes>
  </test> <!-- Test -->
</suite> <!-- Suite -->
- We can run the XML file and this will run the test case inside the class. The below output would be printed on the console.
Executing first test case

===============================================
Suite
Total tests run: 1, Passes: 1, Failures: 0, Skips: 0
===============================================
This is it. We hope that you liked the article. If you have any doubts or concerns, please feel free to write us in the comments or mail us at admin@codekru.com.
