Welcome back
In the previous lesson, you learned how to choose a stable locator. You looked for a unique clue, then proved that your locator matched exactly one element.
That rule still guides this lesson.
Today you will add one new tool. Sometimes a control has no useful unique id, name, or class. However, it sits beside another element that is easy to find. Selenium can use that visible position as a clue.
For example, you might ask Selenium to find the button below a known button. You might also ask for the button to the right of a known label.
First, you will write one working relative locator. After that works, you will learn how to investigate a locator that finds nothing or chooses the wrong control.
Look at the page first
Open only TestKru Buttons for the first half of this lesson.
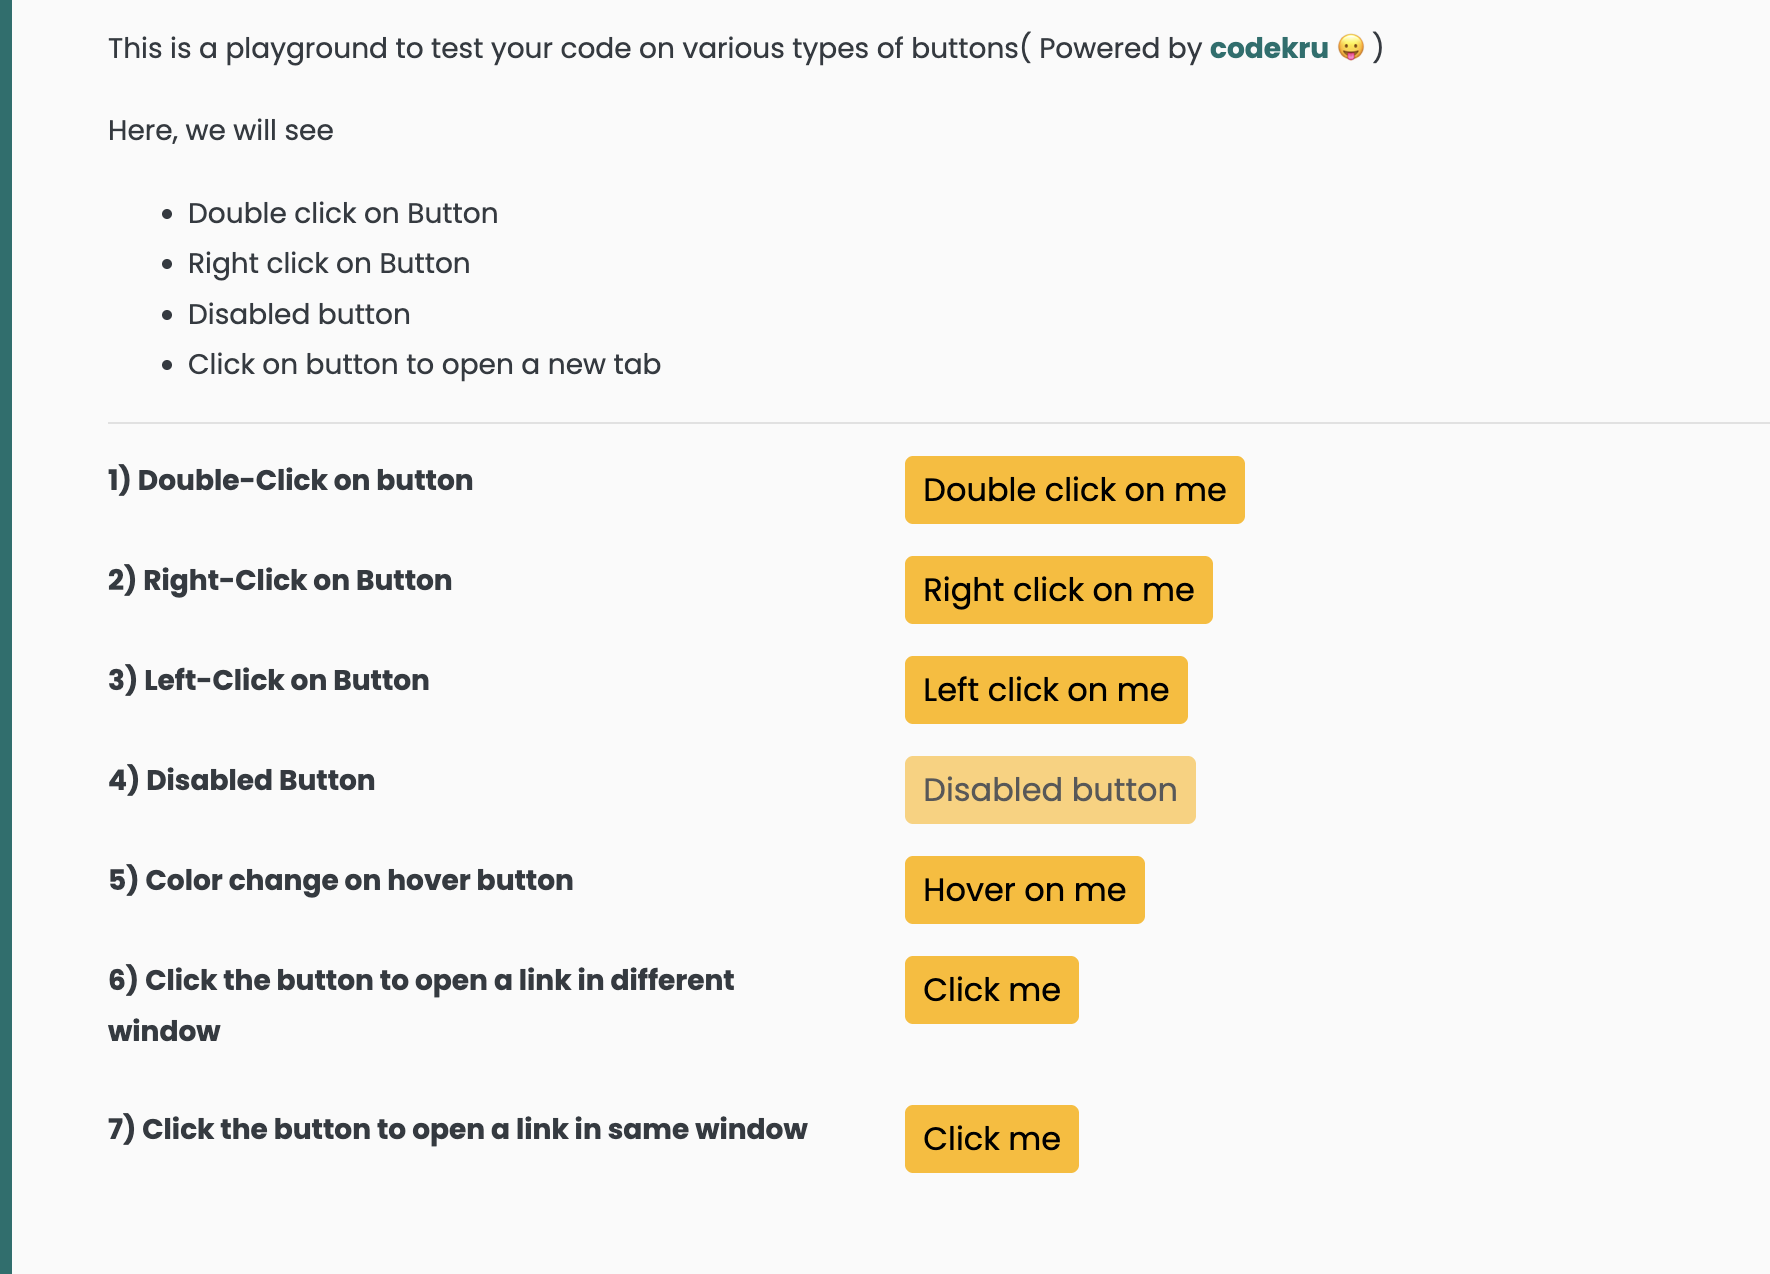
Look at the practice area before you inspect its HTML. The page places a label on the left and a practice button on the right. The rows are stacked from top to bottom.
The layout is roughly:
LEFT COLUMN                         RIGHT COLUMN

Double-click label                 Double-click button  id="doubleClick"
Right-click label                  Right-click button   id="rightClick"
Left-click label                   Left-click button    id="leftClick"
                                   Disabled button      id="disabledButton"
The left-click label has the id leftClickButtonLabel. Its button has the id leftClick.
Sit with that picture for a moment. Do not inspect the HTML yet. Your eyes already know two facts that the HTML tree hides: one button is under another, and one button is to the right of a label.
This layout gives us two clear visual relationships:
- The Right-click button is below the Double-click button.
- The Left-click button is to the right of its label.
You could find these buttons directly because this practice page gives them unique ids. We will temporarily act as if a target button’s id is missing. That lets you learn the relative locator without needing a complicated page.
What a relative locator is
A relative locator finds a target by its position on the rendered page.
The rendered page is what you see in the browser. Each label, field, and button takes up a visible rectangular area. Selenium can compare those areas and decide whether one element is above, below, left, or right of another element.
This is different from an XPath relationship.
XPath can follow the HTML tree. For example, an XPath sibling expression looks for nodes that share the same HTML parent. Two controls can appear beside each other on the screen even when they are stored in different parts of the HTML.
A relative locator cares about the visual arrangement instead. That makes it useful when the page layout gives you a better clue than the HTML tree.
The element you can already find is called the anchor. It gives Selenium a known starting point.
For example:
known anchor: Double-click button
                    |
                    | below
                    v
target:        Right-click button
Use a relative locator when the target is hard to name but a nearby element is easy to find. If the target already has a unique and stable id, keep using By.id. A direct unique locator is simpler and less dependent on the page layout.
You can read the official overview at Selenium relative locators.
Write your first relative locator
Here is the first relative locator. Put it in a test class later. The first line is the import you need.
import org.openqa.selenium.support.locators.RelativeLocator;

WebElement rightClickButton = driver.findElement(
        RelativeLocator.with(By.tagName("button"))
                .below(By.id("doubleClick")));
Read it in the order it is typed.
First, with(By.tagName("button")) says what kind of element you want. Selenium should consider buttons as possible targets. It should not return a label or an input field.
Next, .below(By.id("doubleClick")) gives the direction and the anchor. The target must be below the element whose id is doubleClick.
Finally, driver.findElement(...) asks Selenium for one result. When several buttons satisfy the direction, a relative locator returns the closest matching button.
This single statement therefore means: find the closest button below the element with the id doubleClick.
Notice that the target comes first inside with(...). The known neighbor comes second inside below(...). Reading the code in that order helps prevent the most common mix-up.
Return to the Buttons page and follow the rows from top to bottom.
The closest button below the Double-click button is the Right-click button. Its id is rightClick. Therefore, the locator you just wrote should return that element.
You can prove it by reading the returned id:
WebElement rightClickButton = driver.findElement(
        RelativeLocator.with(By.tagName("button"))
                .below(By.id("doubleClick")));

Assert.assertEquals(rightClickButton.getAttribute("id"), "rightClick");
above asks for the opposite direction. The closest button above rightClick is doubleClick:
WebElement doubleClickButton = driver.findElement(
        RelativeLocator.with(By.tagName("button"))
                .above(By.id("rightClick")));
A direction can describe more than one element. Several buttons are below doubleClick, not just one. findElement takes the closest match.
If you need to see every matching candidate, use findElements. We will use that method later when a locator returns a surprise.
Now look at the Left-click row.
The label with id leftClickButtonLabel appears in the left column. The button with id leftClick appears in the right column.
These two elements sit beside each other, but they are not HTML siblings. An XPath sibling expression would describe the HTML tree, not the visible columns.
toRightOf describes what you can see:
WebElement leftClickButton = driver.findElement(
        RelativeLocator.with(By.tagName("button"))
                .toRightOf(By.id("leftClickButtonLabel")));
Read this as: find the closest button to the right of the known left-click label.
The opposite direction is toLeftOf. For example, you could find a label to the left of a known button:
WebElement leftClickLabel = driver.findElement(
        RelativeLocator.with(By.tagName("label"))
                .toLeftOf(By.id("leftClick")));
This example teaches how the visual relationship works. In a real test on this page, the button already has a unique id. You should keep the simpler locator:
WebElement leftClickButton = driver.findElement(By.id("leftClick"));
That line stores the found button, not a relative search. Use the relative version only when the button’s own useful id is missing but the nearby label remains stable.
Near and chaining
These are the five relative methods you will see in Selenium 4:
| Method | Meaning |
|---|---|
above | the target is above the anchor |
below | the target is below the anchor |
toLeftOf | the target is to the left of the anchor |
toRightOf | the target is to the right of the anchor |
near | the target is close to the anchor |
The near method does not name a direction. It only asks whether a candidate is close. Selenium’s documented default is at most 50 pixels.
The Java code looks like this:
RelativeLocator.with(By.tagName("button"))
        .near(By.id("doubleClick"));
On the Buttons page, the gap between a label and its button is more than 50 pixels. Default near is therefore not the right description for that pair. toRightOf matches the visible layout more clearly.
Prefer a direction when you know the direction. Use near only when being close is the real clue and the controls are actually within the chosen distance.
You can also join directions:
WebElement rightClickButton = driver.findElement(
        RelativeLocator.with(By.tagName("button"))
                .below(By.id("doubleClick"))
                .toRightOf(By.id("rightClickButtonLabel")));
Each added direction must be true at the same time. The target must be below doubleClick and to the right of rightClickButtonLabel.
Chaining can remove unwanted candidates when one direction is too broad. Keep the chain short. Every visual condition makes the locator more dependent on the current layout.
When a relative locator is the wrong tool
Choose a locator from the clue the page gives you:
- Prefer a unique, stable id.
- Use a unique name or short CSS selector when it gives a clear match.
- Use XPath when the useful clue is text or a relationship in the HTML tree.
- Use a relative locator when visual position beside a stable anchor is the useful clue.
Skip a relative locator when the layout can wrap. A button that appears to the right on a wide window may move below its label on a narrow window. Maximize the browser window in these practice tests so the page keeps the expected desktop layout.
Also skip it when you need an element from the same HTML row, such as a particular cell in a table. That is a tree relationship. A scoped CSS locator or XPath describes it more directly.
What to do when findElement fails
You can now write a relative locator and predict its result. That makes debugging much easier.
There are two different problems:
- Nothing matched, so
findElementthrowsNoSuchElementException. - Something matched, but Selenium returned the wrong control.
Treat these as separate investigations. Selenium’s official error guide is available at Understanding common Selenium errors.
Nothing matched
Use this short checklist when you see NoSuchElementException.
- Confirm the page. A locator for
doubleClickcannot work while the browser is on another page. - Check the spelling and locator strategy. Make sure the id is exact. Make sure CSS text is passed to
By.cssSelectorand XPath text is passed toBy.xpath. - Ask whether the element is in this document. A control inside a frame belongs to another document. Frames are taught in Module 5.
- Ask whether the element exists yet. Some pages add controls after loading or after an action. Waits are taught in Module 4.
Do not change several things at once. Start with the URL and the anchor. If Selenium cannot find the anchor, changing below to above will not help.
The wrong control matched
findElement does not warn you when a locator matches several candidates. It chooses one.
Use findElements(...).size() to expose that problem:
int buttonCount = driver.findElements(
        By.cssSelector("button.btn")).size();
On the Buttons page, button.btn matches more than one button. A general button search can also include a page control such as the sidebar Toggle Menu. That is why a broad target description can return an element you did not expect.
Now open TestKru Text Fields. This is the first time you need this page in the lesson.
The page contains two nodes with id="firstName". An id is supposed to identify one element, but real pages can contain mistakes. Check rather than assume:
int firstNameCount = driver.findElements(
        By.id("firstName")).size();
The result is 2. If your test needs one exact field, By.id("firstName") is not unique on this page.
Relative locators require one more debugging habit. You cannot paste Java such as RelativeLocator.with(...).below(...) into the DevTools search box.
Instead:
- Check the anchor in DevTools and confirm that it matches once.
- Look at the rendered page and confirm the direction with your eyes.
- Use
findElementsin Java and print the candidates.
for (WebElement candidate : driver.findElements(
        RelativeLocator.with(By.tagName("button"))
                .below(By.id("doubleClick")))) {
    System.out.println(
            candidate.getAttribute("id") + " | " + candidate.getText());
}
The list shows which buttons satisfied the relative locator. If the first one is wrong, narrow the target, correct the direction, or add one useful chained condition.
A complete TestNG example
The complete example brings the lesson together in one class. It assumes that your existing Maven project already has Selenium 4 and TestNG configured.
Save the class
Create this file:
src/test/java/com/codekru/tests/RelativeLocatorPracticeTest.javaIf your project uses a different base package, change the package line to match it.
The complete example
package com.codekru.tests;

import org.openqa.selenium.By;
import org.openqa.selenium.WebDriver;
import org.openqa.selenium.WebElement;
import org.openqa.selenium.chrome.ChromeDriver;
import org.openqa.selenium.support.locators.RelativeLocator;
import org.testng.Assert;
import org.testng.annotations.AfterMethod;
import org.testng.annotations.BeforeMethod;
import org.testng.annotations.Test;

public class RelativeLocatorPracticeTest {

    private WebDriver driver;

    @BeforeMethod
    public void setUp() {
        driver = new ChromeDriver();
        driver.manage().window().maximize();
    }

    @Test
    public void shouldFindControlsAndCheckLocatorCounts() {
        driver.get("https://testkru.com/Elements/Buttons");

        WebElement buttonBelowDoubleClick = driver.findElement(
                RelativeLocator.with(By.tagName("button"))
                        .below(By.id("doubleClick")));

        Assert.assertEquals(
                buttonBelowDoubleClick.getAttribute("id"),
                "rightClick");

        WebElement buttonBesideLeftClickLabel = driver.findElement(
                RelativeLocator.with(By.tagName("button"))
                        .toRightOf(By.id("leftClickButtonLabel")));

        Assert.assertEquals(
                buttonBesideLeftClickLabel.getAttribute("id"),
                "leftClick");

        Assert.assertTrue(
                driver.findElements(By.cssSelector("button.btn")).size() > 1,
                "button.btn should demonstrate a non-unique locator");

        Assert.assertEquals(
                driver.findElements(By.id("leftClick")).size(),
                1,
                "leftClick should be unique");

        driver.get("https://testkru.com/Elements/TextFields");

        Assert.assertEquals(
                driver.findElements(By.id("firstName")).size(),
                2,
                "firstName is duplicated on this practice page");

        WebElement lastName = driver.findElement(
                By.id("lastNameWithPlaceholder"));

        lastName.clear();
        lastName.sendKeys("codekru");

        Assert.assertEquals(
                lastName.getAttribute("value"),
                "codekru");
    }

    @AfterMethod
    public void tearDown() {
        if (driver != null) {
            driver.quit();
        }
    }
}
Understand each part
The imports bring in WebDriver, element locators, relative locators, TestNG assertions, and TestNG annotations.
setUp() runs before the test. It starts Chrome and maximizes the window. The larger window matters because relative locators follow the current layout. A narrow layout might move a button below its label.
The test first opens the Buttons page.
The first relative locator asks for the closest button below doubleClick. The assertion checks that Selenium returned rightClick. Checking the id proves which button won.
The second relative locator asks for the closest button to the right of leftClickButtonLabel. Its assertion expects leftClick.
The next two assertions compare a weak locator and a strong locator. button.btn matches more than one element, while By.id("leftClick") matches exactly one.
The test then opens Text Fields. It proves that firstName occurs twice. This is why checking a match count is safer than trusting the word “id.”
The last-name field has the unique id lastNameWithPlaceholder. The test finds it directly, clears its current value, types codekru, and confirms the field now contains codekru. We use the direct id because a relative locator would add no value here.
tearDown() runs after the test. The null check protects cleanup if browser setup fails. driver.quit() closes the complete browser session.
Run it and check the result
In IntelliJ, open RelativeLocatorPracticeTest.java. Click the run icon beside the test method or the class name.
You can also use the TestNG Maven command already used in your project.
Chrome should open at the Buttons page. The locator assertions should pass. The browser should then open Text Fields, type codekru into the last-name field, and close.
If an id assertion fails, print the relative candidates before changing the locator. If a count assertion fails, inspect the current page again. The page structure may have changed since the lesson was written.
Common beginner mistakes
- Reversing the target and anchor. Put the type you want inside
with(...). Put the known neighbor insidebelow(...),above(...), or another direction method. - Using a broad target.
with(By.tagName("button"))may include practice buttons and site controls. Check candidates when the result surprises you. - Expecting
nearto mean any visible neighbor. Its default limit is 50 pixels. Use a clear direction when you know one. - Testing a visual relationship in a narrow window. The layout may wrap. Maximize the window for this exercise.
- Trying to paste Java relative locator code into DevTools. Check the anchor there, then print the relative candidates from Java.
Practice assignment
Practice the match-count habit before moving to element actions.
Your task:
- Open the assignment page linked below.
- Inspect the target controls. List id, name, class, and tag.
- Use DevTools search or
findElementsto count matches for a class locator and for a tighter locator. - Write a Selenium Java test that finds the intended element with a unique clue.
- If a class matches extra nodes, do not use that class locator for a single-element action.
- Do not look up a finished solution.
Continue practicing: Find Element by Class Name
For optional practice with relationships in the HTML tree, try XPath Axes – Parent and Sibling. Remember that XPath axes follow the HTML tree, while relative locators follow the visible layout.
You can browse every exercise in the Selenium learning catalog.
What is next
You have finished Module 2. You can now choose direct locators, use a visual relationship when needed, and investigate zero matches or a wrong match.
Module 3 begins with Essential WebElement Methods: Click, Type, Clear, Read, and Validate. You will use trusted locators to work with the controls you find.