Welcome back
You have finished Module 2. You can now choose a stable locator, use a visual relationship when you need one, and check whether a search matched once.
Finding a control is only the first half of a test. A locator that returns the last-name field does not, by itself, prove that a user can type a name. A locator that returns a button does not prove that the click does anything useful.
Today you start Module 3: Interacting with Web Elements. You will take a WebElement you already know how to find, then click it, type into it, clear it, read what the page shows, and check the result with an assertion.
Open TestKru Buttons for the first half of the lesson. You will switch to TestKru Text Fields when it is time to type.
Find, then act
Almost every beginner interaction uses the same order.
1. Open the page with driver.get(...)
2. Find one control with findElement(...)
3. Act on that WebElement (click, sendKeys, or clear)
4. Read what the page now shows
5. Assert that the result is the one you expected
You practiced steps 1 and 2 throughout Module 1 and Module 2. This lesson is about steps 3, 4, and 5.
A WebElement is one control on the current page: a button, a text box, a label, or similar. The methods you call on it belong to that one control. click() clicks that button. sendKeys("codekru") types into that field. The driver still owns the browser session. The element owns the action on the control.
Keep that split in mind when a line fails. If Chrome never opened the page, the problem is the driver step. If the page is open and the control is missing, the problem is the locator. If the control is found and the action still fails, the problem is the WebElement method or the control’s current state.
Selenium’s element interaction guide groups the everyday actions into a short list. Click, type, and clear are the ones you will use constantly. You will click a visible button in this lesson. Dropdowns come later in this module.
Here is the map for today:
| Job | Method | Typical control |
|---|---|---|
| Left-click | click() | Button or link |
| Type | sendKeys("codekru") | Text box or textarea |
| Empty a field | clear() | Text box or textarea |
| Read visible wording | getText() | Button, label, paragraph |
| Read a typed value | getAttribute("value") | Input field |
| Check the result | Assert.assertEquals(...) | Any value you just read |
The next lesson covers whether a control is visible, enabled, or selected. Today, stay with the action and the proof.
Stay on the Buttons page. Look at row 3, Left-Click on Button.
The button on the right has the id leftClick. Its visible wording starts as “Left click on me“.
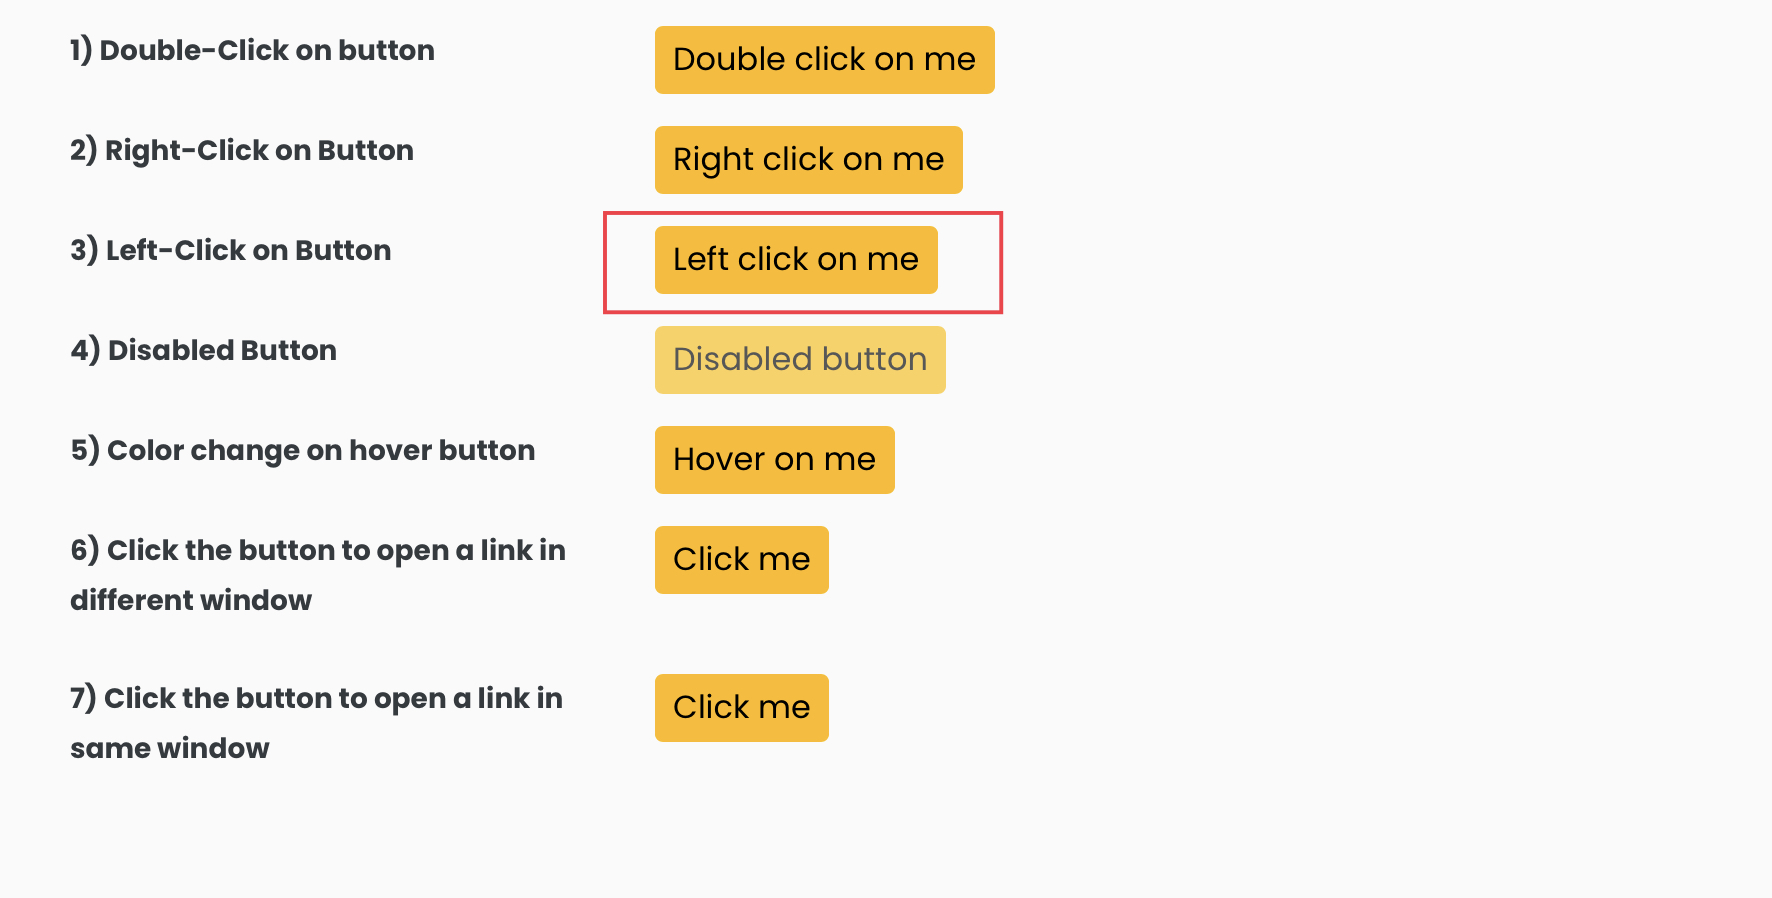
That is the right practice control for click().
Skip the other rows for this lesson:
- Double-click and right-click need a later tool (Module 5).
- The disabled button should not be clicked. The next lesson shows how to check that state first.
- The last two buttons open another tab or another page. Window handling also belongs later.
click() performs a left click on the center of the element. Selenium first tries to scroll the control into view, then checks that a person could use it. The control must be displayed, and it must have a height and width greater than zero. If another banner covers that center point, the click can fail even though you can still see part of the button.
Find the button with the unique id you already trust, then click it:
WebElement leftClickButton = driver.findElement(By.id("leftClick"));
leftClickButton.click();
Those two lines find the button and left-click it. They are not yet a complete check.
After a successful left click, the same button’s wording changes to I was left-clicked!. That change is the proof. You do not guess that the click worked. You read the new text. Add the assertions around the same click:
Assert.assertEquals(leftClickButton.getText(), "Left click on me");
leftClickButton.click();
Assert.assertEquals(leftClickButton.getText(), "I was left-clicked!");

getText() returns the visible wording of the element. It is the right read for a button label, a heading, or a paragraph you can see on the page.
This left click does not open a new page. The button stays on the same Buttons screen, so you can keep using the same WebElement to read the new wording. If a later click sent you to a different page, you would find the new page’s controls after the navigation.
Watch Chrome while the test runs. The left-click button should change from Left click on me to I was left-clicked! as soon as the click lands. If the wording never changes, the click did not hit this practice button.
If click() cannot use the control, Selenium throws an error instead of clicking. The message may say the element is not interactable, or that the click was intercepted. In beginner terms, the search found the control, but the click still could not happen the way a person would click. A hidden field or a covered button can cause that.
A disabled control is a different case. Selenium can still find it, and a click may produce no useful page change. Leave the disabled button for the next lesson, where you will check whether a control can be used before you act.
Do not fight a failed click by changing a locator that already found the right control. First look at the page: is the control on screen, uncovered, and usable?
Type into a field
Now open https://testkru.com/Elements/TextFields.
Use field 2, the last-name box. Its unique id is lastNameWithPlaceholder. Its placeholder text is Enter your last name.... That placeholder is a hint painted on the empty field. It is not the typed value.
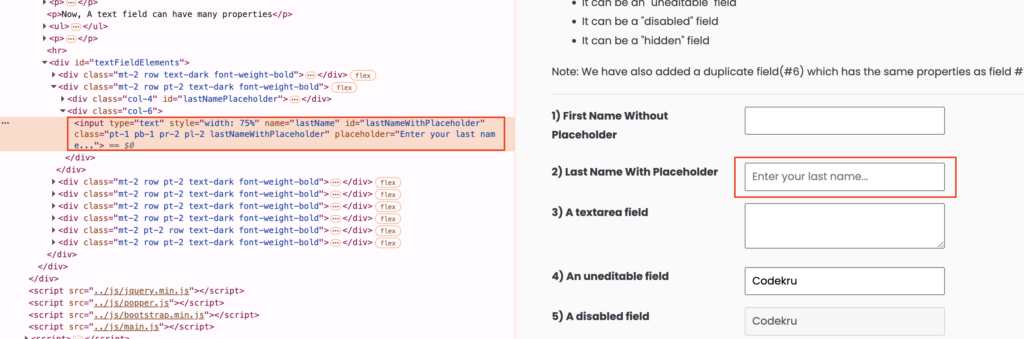
sendKeys simulates typing. Selenium sends the characters to a control that can accept keyboard input, usually a text box or a textarea. If the control cannot be typed into, Selenium reports that the element is in an invalid state. On this page, that is why you should not type into the read-only box or the disabled box yet.
WebElement lastName = driver.findElement(By.id("lastNameWithPlaceholder"));
lastName.sendKeys("codekru");
After this line, the field should contain codekru.
Here is the surprise that catches almost every beginner: getText() on this input returns an empty string. The letters you typed are stored as the field’s value, not as visible inner text the way a button label is.
Read the typed value like this:
Assert.assertEquals(lastName.getAttribute("value"), "codekru");
getAttribute("value") returns the current contents of the box, including text you just typed. Selenium reads the field’s current value, even if that value changed after the page loaded. You can read other named details the same way. For this field, getAttribute("placeholder") returns Enter your last name.... The placeholder is still a hint on the field even after you type. It is not the value you just entered.
Watch the last-name box in Chrome. After sendKeys("codekru"), the visible letters in the box should be codekru. The placeholder hint should no longer act as the content of the field.
That distinction is the whole reading rule for this lesson:
- Visible wording you can see on a button or paragraph:
getText() - Text sitting inside an input:
getAttribute("value")
sendKeys types into the field. It does not automatically clear what is already there. If you call it twice on an empty last-name field, the two pieces join:
lastName.sendKeys("code");
lastName.sendKeys("kru");
Assert.assertEquals(lastName.getAttribute("value"), "codekru");
That join is useful when you mean to continue typing. It is a problem when the field already contains someone else’s text.
Do not use By.id("firstName") on this page for a single-field action. Module 2 showed that firstName occurs twice here. The last-name id is unique, so keep using it.
Clear a field before you replace it
Scroll to the pre-filled field. Its id is preFilledTextField. It already contains Codekru when the page loads.
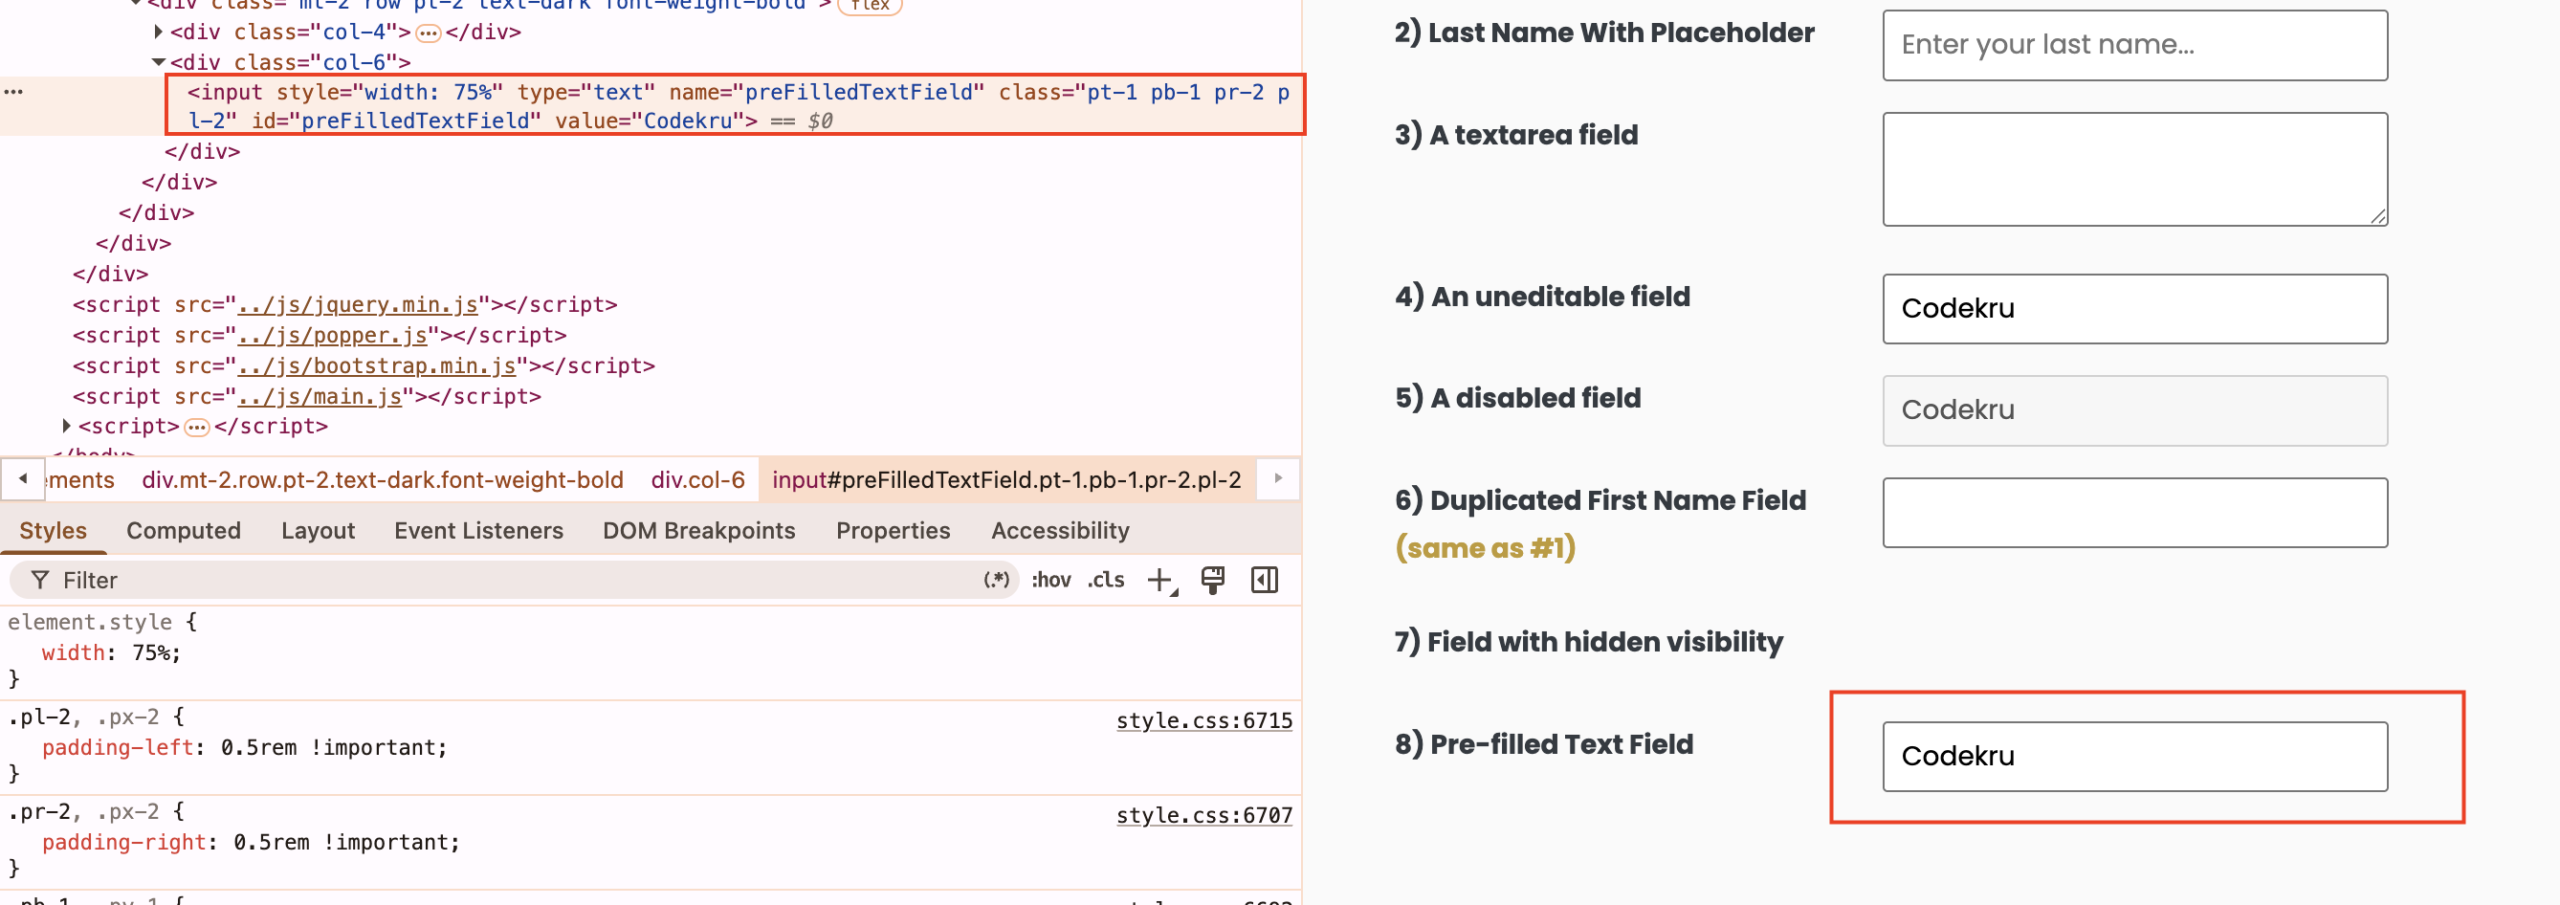
If you only call sendKeys("codekru") on that field, the new text is added after the old text. The value becomes Codekrucodekru. That is rarely what a test wants.
clear() resets a text-entry field.
WebElement preFilled = driver.findElement(By.id("preFilledTextField"));
Assert.assertEquals(preFilled.getAttribute("value"), "Codekru");

preFilled.clear();
Assert.assertEquals(preFilled.getAttribute("value"), "");

preFilled.sendKeys("codekru");
Assert.assertEquals(preFilled.getAttribute("value"), "codekru");
Read those assertions slowly. The starting value is Codekru with a capital C. After clear(), the value is an empty string. After sendKeys("codekru"), the value is exactly codekru in lowercase. Assertions compare character by character.
clear() is for editable text controls. It is not the tool for emptying a button or a label. If the field is not editable, Selenium reports an invalid element state. On this practice page, skip the read-only field (uneditable) and the disabled field (disabledField) until the next lesson.
A reliable replace therefore has three steps: read the old value if you care about it, clear(), then sendKeys.
Calling clear() on a field that is already empty is still useful. The last-name box starts blank, and the complete example still clears it. That makes the starting state predictable even if a previous experiment left text behind.
Read the right value, then assert it
You have already used both reading methods. This section only names the habit so you can reuse it on new pages.
A test that clicks and types, then ends, is a demonstration. It is not a check. The assertion is the sentence that can fail when the product is wrong.
| After you… | Read this | Then assert |
|---|---|---|
Click leftClick | getText() | The wording became I was left-clicked! |
| Type into last name | getAttribute("value") | The value is codekru |
| Clear the pre-filled field | getAttribute("value") | The value is "" |
| Replace that field | getAttribute("value") | The value is codekru |
Use Assert.assertEquals(actual, expected) when you know the exact string. Put the value you read first and the value you expect second, matching the TestNG style you have used since the setup lesson.
If the assertion fails, read the TestNG message. It shows both strings. A capital letter, an extra space, or leftover old text from a missing clear() will show up there.
Do not treat a successful findElement as the final check. Finding leftClick only proves the button exists. Reading I was left-clicked! proves the click had the page effect you care about.
A complete TestNG example
The complete example puts the whole loop in one class: click and prove, type and prove, clear and replace and prove. It assumes that your existing Maven project already has Selenium 4 and TestNG configured.
Save the class
Create this file:
src/test/java/com/codekru/tests/WebElementMethodsPracticeTest.javaIf your project uses a different base package, change the package line to match it.
The complete example
package com.codekru.tests;

import org.openqa.selenium.By;
import org.openqa.selenium.WebDriver;
import org.openqa.selenium.WebElement;
import org.openqa.selenium.chrome.ChromeDriver;
import org.testng.Assert;
import org.testng.annotations.AfterMethod;
import org.testng.annotations.BeforeMethod;
import org.testng.annotations.Test;

public class WebElementMethodsPracticeTest {

    private WebDriver driver;

    @BeforeMethod
    public void setUp() {
        driver = new ChromeDriver();
        driver.manage().window().maximize();
    }

    @Test
    public void shouldClickTypeClearAndReadResults() {
        driver.get("https://testkru.com/Elements/Buttons");
        Assert.assertEquals(driver.getTitle(), "Buttons");

        WebElement leftClickButton = driver.findElement(By.id("leftClick"));
        Assert.assertEquals(leftClickButton.getText(), "Left click on me");

        leftClickButton.click();
        Assert.assertEquals(leftClickButton.getText(), "I was left-clicked!");

        driver.get("https://testkru.com/Elements/TextFields");
        Assert.assertEquals(driver.getTitle(), "Text Fields");

        WebElement lastName = driver.findElement(By.id("lastNameWithPlaceholder"));
        lastName.clear();
        lastName.sendKeys("codekru");
        Assert.assertEquals(lastName.getAttribute("value"), "codekru");
        Assert.assertEquals(
                lastName.getAttribute("placeholder"),
                "Enter your last name...");

        WebElement preFilled = driver.findElement(By.id("preFilledTextField"));
        Assert.assertEquals(preFilled.getAttribute("value"), "Codekru");
        preFilled.clear();
        Assert.assertEquals(preFilled.getAttribute("value"), "");
        preFilled.sendKeys("codekru");
        Assert.assertEquals(preFilled.getAttribute("value"), "codekru");
    }

    @AfterMethod
    public void tearDown() {
        if (driver != null) {
            driver.quit();
        }
    }
}
Understand each part
The imports bring in WebDriver, locators, WebElement, Chrome, TestNG assertions, and the TestNG lifecycle annotations.
setUp() starts Chrome and maximizes the window before the test. Maximizing is not required for typing. It simply makes the practice controls easier to see while you watch the test run.
The test first opens the Buttons page and checks the title. That confirms you landed on the right document before you search.
It then finds leftClick, checks the starting wording, left-clicks, and checks the new wording. Those two getText() assertions are the click proof.
Next it opens Text Fields and checks that title. The last-name field is unique, so By.id("lastNameWithPlaceholder") is the locator. clear() makes the starting state predictable. sendKeys("codekru") types the sample text. getAttribute("value") reads that typed text back. The placeholder assertion double-checks that you still have the same field you inspected.
The pre-filled field starts with Codekru. The test proves that starting value, clears it, proves the empty string, types codekru, and proves the replacement. If you skip clear(), the last assertion fails because leftover text remains.
tearDown() calls quit() so the browser session does not stay open. The null check protects cleanup if Chrome never started.
Run it and check the result
- Save the class in your existing test package.
- In IntelliJ, open
WebElementMethodsPracticeTest.javaand runshouldClickTypeClearAndReadResults. - You can also use the TestNG Maven command already used in your project.
Chrome should open the Buttons page, change the left-click button text, open Text Fields, type codekru into last name, replace the pre-filled value, pass every assertion, and close.
If the click assertion fails, inspect leftClick on https://testkru.com/Elements/Buttons and confirm you used a normal left click. If a value assertion fails, print getAttribute("value") and look for leftover text or a capital letter.
Common beginner mistakes
- Reading an input with
getText(). Typed characters live invalue. UsegetAttribute("value")for the last-name field and the pre-filled field. - Typing without
clear()on a field that already has text.sendKeysappends. The pre-filled field becomesCodekrucodekruif you skipclear(). - Treating a successful
findElementas proof. Finding the button is not the same as proving the click changed the page. - Using
click()for double-click or right-click.click()is a left click. Those other gestures wait until Module 5. - Clicking a hidden, covered, or disabled control. A hidden or covered control can make
click()throw an error. A disabled control may be found and still produce no useful page change. Check the page, then use the state methods in the next lesson. - Matching text with the wrong capitals.
Codekruandcodekruare different strings. Read the assertion failure before you change the locator.
Practice assignment
Lock in the action-then-assert habit before you move on.
Your task:
- Open the assignment page linked below.
- Inspect the target control and choose a unique locator.
- Write a Selenium Java test that performs the requested action.
- Read the result with
getText()orgetAttribute("value"), whichever matches the control. - Assert the exact result. Do not stop at
findElement. - Do not look up a finished solution.
Continue practicing: Click a Button
Then continue the same catalog group with Type Text with sendKeys() and Clear and Replace Text. Those two exercises reuse today’s typing and clearing steps.
You can browse every exercise in the Selenium learning catalog.
What is next
You can now click, type, clear, read, and assert. Those five steps turn a locator into a real check.
The next lesson is Element States and Attributes: Visible, Enabled, Selected, Text, CSS. You will ask whether a control is shown, whether it can be used, and how to read richer details before you act.